Resources
First things you need to consider are the resources available for the terraforming operation. What kind of budget you have, and how many devout citizens or mutant slaves you can put to work on the to be battlefields. We've found scenery making to be less grudging an experience in good company, so I would suggest that you recruit a few fellow madmen for the task.The basic materials are not terribly expensive, an investment of a few hundred pounds is more sufficient to buy the materials to landscape twenty or thirty gaming tables. Warhammer (Fantasy) is much less scenery hungry than 40k, which has to be considered if you're specialising on either one of the games. Also some of the scenery themed for 40k is not very suitable for Warhammer, as power lines and factory complexes do not go really well with marauding Dark Elves.
I would suggest first making enough basic terrain elements - hills, woods and linear obstacles - to make the tables playable, and then concentrate on the focus elements. Building the focus elements is time consuming, and you can easily get carried away with them, and forget the main thing!
One resource often overlooked is the storage and transportation of the massed hills and forests. Storing the innumerable cardboard boxes in peoples' homes will annoy if nobody else, the possible spousal overunits, and scenery is of no use if you cannot get it to the tournament venue at the right time! So, before building too many hills, make sure you have a place to store them in when they are not in use.
Generic considerations
When building tournament scenery you should take few things into consideration. First is the rough treatment the scenery is sooner or later going to get, either in the heat of the battle, or when the scenery is being stored and carried from one place to another. So, build all the terrain to be as robust as possible. The second thing to consider is the possibility of an infidel stealing a grand-looking piece. This might sound ridicilous, but I have lost at least two meticulously crafted terrain pieces in tournaments, most probably to lowly thieves. Third thing is storing all of the stuff you've managed to build. Make sure that you have enough cardboard boxes or the likes to gently pile all the stuff in, and that the boxes are large enough to accommodate the largest pieces. It's a good idea to put delicate things such as trees and such into separate boxes and not overfill any of the boxes.What comes to paints and glues, in general miniatures paints are very expensive due to the required high quality. In terrain building the quality is overkill, and you should look for cheaper paints in the DIY stores and artists' and generic hobby stores. The DIY stores have all kinds of wonderous concotions for house interior work, and the artists' stores should carry relatively cheap acrylic paints. You will probably ever need maximum of four different types of glue. Superglue, PVA glue, polystyrene cement and two component epoxy glue. The last of which is reserved for the very difficult materials, which refuse to adhere with the three previous ones. In general superglue is good for just about everything, but expensive, polystyrene cement is restricted to polystyrene and PVA is cheap, water-soluble. but not very strong.
You'll of course need a place to make all the scenery. The best place is, rather unsurprisingly the venue used to play the games. The tables used for gaming can be converted into terraforming fields by protecting them with paper. Newpaper has the nasty tendency of leaving black stains, so it's probably easiest to invest in a large roll of wide paper specifially for this purpose. Having the place for several days would be a big advantage, as it is convenient to leave the various stages to dry overnight.
Theming
The first thing to consider is whether you want to theme the tables to some environment or not. We have decided to make "green tables", "yellow tables", "gray tables" and "white tables", specifially forested, desert, ash waste and arctic tables. This is an easy way to add a little bit of variety into the overall look of the tournament hall, all the while maintaining similar gaming environment on all the tables.
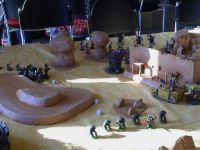
Overviews of a desert, ash waste and barren rock tables. Click the pictures for a larger view. All pictures by Jorge Mäkinen.
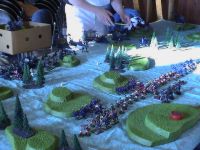
Overviews of a forested and marsh-like tables. Again click the pictures for a larger view.In general for a satisfactory gaming table you will need a scattering of hills, a few pieces of woodland-equivalents, and one "special feature". The special features can be insignificant in terms of game play, but add nice variety and a focal point to the overall look of the table. Examples of special features are the already mentioned power lines, houses, graveyards and ruined temples.


Groundwork, a.k.a. the Emperor's New Clothes
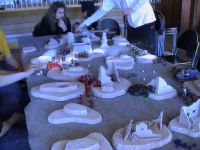
Materials required: Cloth, possibly scissors or knife.The first thing to consider is of course the ground the brave soldiers tread on. The best option for easily deployable and removable scenery seems to be cloth bought from a suitable shop. You can get it in almost any imaginable colour (and patterning), and it needs no further work. Cloth is also easy to store, and in the event of a chemical spill in the heat of the battle, also easy to wash. The pictures above should give an indication of what kinds of materials work well as table coverings.
Making textured tables is for the more permanent set-ups, and also significantly more expensive than the clothing method.
Hills
Materials required: Styrofoam, latex paint, (textured paint, sand,) foam cutter or sharp knives, PVA glue, paint brushes of the house painting variety. Optionally foam board - board with foam sandwiched between two sheets of cardboard.The easiest terrain element to manufacture in numbers is a styrofoam hill. Strofoam boards are available in a variety of thicknesses, the best and simplest to use are the one and two inch varieties. Cut it with a hot wire cutter (available from GW Mail Order, I believe, and well stocked DIY stores) or a very sharp knife
to desired shapes. To make two or multi-tiered hills pin the pieces together with coctail sticks and glue the pieces together with PVA glue. If you're on a tight budget (or downright lazy, but that would be sinning against the Emperor!), just painting the styrofoam with matte or semi-matte latex paint will do. Latex paint is the type of paint used for house interiors. Water soluble and non-toxic, and also about the only type of paint besides acrylics the styrofoam tolerates without melting.
However, a much better result will be achieved by texturing the hills. For this we have used textured paint, available from the same places as the latex paint. It's possible to tint it to light colours, which saves you the trouble of painting the base colour on the hills. The best texture is obtained by mixing the textured paint with sand and suitable amount of water - in order to avoid spoiling the whole can of paint, mix the sand and water into the paint on top of the terrain pieces. Smallish amoun of sand will do, and adding just enough water to thin the mixture of well flowing is the right way to go. Experimenting a bit will provide you with the best results, as writing a hard, easy to follow recipe is rather difficult.
This is what textured hills look close up. Cool, ain't they!After texturing the hills, you need to paint them with the base colour - unless the textured paint was already of the right tone - and after the paint is dry, drybrush them. Again use latex paint as it's far cheaper than acrylics. Simply mixing the base colour with a suitable lighter tone should do, or you can buy a separate drybrushing colour of a suitable tone.
Adding ruins to the hills is easy. Cut appropriately shaped pieces of foamboard to make the ruined walls and glue these onto the hills with PVA before texturing. Add the texture over the whole bit, this way the ruins tend to look ancient and thoroughly weather beaten, just as it should be for a few pieces of walls still standing.


Patches of Woods
Materials required: Model trees, (black spray, spray glue, suitable green flock,) polystyrene sheet - ie. plasticard, strong scissors, superglue, PVA glue, sand, acrylic paints.Making areas of woodlands is easier and faster than making hills, but alas a bit more expensive. If you're swimming in money, buying the ready-made Citadel trees is a good option, but you'll spare a lot of if you invest in bulk trees found in model railroad scenery ranges (for brands, look for Noch or Woodland Scenics). You ought to be able to get a bag of fifty, yes 50, ferns for under 15 UK Pounds.
The bulk trees need to be sprayed black, as they tend to come in the more unnatural shades of green. After that, spray them with glue and apply the flock. The best result is achieved by using olive green ground green foam - available in the same model railroad ranges as the trees themselves - as the foam tends to look more natural than dyed sawdust.
The bases of the trees are best constructed from polystyrene sheet, 2 mm is a good thickness. It's easy enough to cut with heavy scissors, and things can be glued to it with polystyrene cement - the same stuff you use to assemble plastic miniatures - or superglue. The size of the bases is entirely up to you. It's convenient to make the bases large enough to accommodate a few trees, with enough space between them to put models into. Another commonly used option is to make individual trees and arrange them into suitable wooded areas on the tables.
If the trees come with stands, simply glue them onto the cut piece of sheet with superglue. Note that the plastic used for the tree stands is not necessarily polystyrene, and therefore polystyrene cement might not necessarily work. If the trees are without stands, you need to drill holes for the wire tree "trunks" into the plasticard.
Drop small drops of superglue onto the base, and sprinkle sand onto them. Once the superglue is dry, paint PVA glue all over the base and sprinkle more sand onto them. The superglue step is included to attach the PVA glue properly onto the base - if you just applu PVA glue and sand onto the plastic surface, dropping the base will probably cause the PVA glue to come off as a single piece. Hardly something you want to happen. Once the PVA is dry, spray the bases black and drybrush heavily with a suitable dark brown and then more lightly with a lighter shade, such as bleached bone.
After the trees and bases have dried, attach the trees onto the bases.

A detail picture showing woodlands terrain

Woods-Equivalents
Materials required: As woods, but instead of trees and flock, rocks or tree trunks or hexagonal plastic rod or something even weirder.As trees do not fit very well into desert or ash wastes, something else has to take their role on the tabletop. Simply gluing Marine-sized rocks - yes, real rocks - onto the plasticard bases and applying the hill texturing procedure will get you nice patches of difficult ground which fit nicely to any themed terrain. For ash wastes, using model tree trunks without any leaves will get you nice dead woodlands areas. Crystal forests can be crafted out of hexagonal rods, and for the more esoteric battlefields only your imagination sets the limits!
In game terms you can simply state that during the tournament these count as woods for rules purposes, or let the players decide themselves how they want to play things.
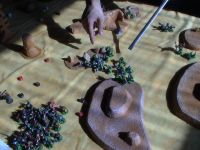
A godly hand pointing at a patch of rocks which double as woods on the desert.

Linear Obstacles
Materials required: Plasticard, scissors, superglue, PVA glue. Coarse turf for hedges, foamboard for walls, etched razorwire for, surprise, razorwire, plastic rod or leftover sprues and suitable mesh for mesh fences, balsa sticks or similar wooden bits for wooden fences, you name it. Though a very technical term, the linear obstacles come in a variety of essentially similar things. Hedge rows, walls, fences, razorwire, you name it.Basically you need to cut a suitably irregularily shaped, but straight piece from the plasticard, attach the obstacle on it and glue sand onto the base. Hedges are the easiest to make, as you can make do without texturig the base, but just simply gluing coarse foam turf - again from model raildoad scenery ranges - onto the base to form a bush-like structure.
Walls are also relatively simple to make, cutting suitably high, about 2 cm strips of foamboard, glue it onto the base and texture and paint as with the hills. Painting the ground in some of the table colours and the wall gray will produce a stone wall which stands nicely out of the table. With a bit more work, making metal mesh fences and fences build from timber can also be built.
The More Complex Projects
These would be focal elements. Again, if you're swimming in money, buying things straight from Forge World, Armorcast or other terrain makers works very nicely. But as I suspect that you are as poor as every other club, raiding the model railroad store is again a good idea. Things like bridges and power lines are rather cheap and look very good on the more sci-fi-oriented tables.Vehicle wrecks are also good elements for 40k tables. Dropping a plastic model into boiling water makes it warp very nicely, and leftover vehicles from Gorkamorka have produced wonderful wrecks. Then glue the wreck onto a piece of plasticard and add rocks and sand (or other things like trees and ruined walls) to taste.
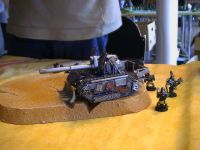
An easily made focal point - essentially a variation of a hill.

Further Inspiration
Reading various books on scenery crafting can give you both good tips on achieving specific results, as well good ideas on simple, yet effective terrain features. First one among these are of course GW's book on building wargames terrain and the various scenery articles in WD, but there are plenty of other, similar books around as well. Another good source of things to, ahem, be inspired by, are the various terrain manufacturers' websites and catalogues.Should you have the chance to visit GW HQ gaming hall, that is probably the most brilliant example of devout work at providing battlegrounds for the people. In there you can also find themed boards like a huge tank factory complex and a trench system. Another good place to view a diversity of battlefields is of course the Games Day or some other games convention with high-quality miniatures games, with an absolutely huge number of different, often themed games tables provided both by the staff and Games Clubs alike. Definitely a good destination for a little pilgrimage for inspiration.
Our story
We have a group of five gamers running tournaments, and we have made about a vanful of scenery solely for tournament use. We started simply, by cutting one inch styrofoam boards into hills, and painted these with green paint. These were combined with scenery bits all of us brought from our own collections, and thus the first tournaments were fought out.Over the time we grew more ambitious, and decided that the scenery needed an overhaul and some elaboration. We invested in foamboard and textured paint, and made quite a bit more hills, some of them littered with ruins. We ended up spending three consecutive days in our tournament hall before one event, feverishly cutting, texturing and painting the hills and wooded areas. It did pay off, though, as the looks of amazement and cheery cries of joy on the pariticipants faces definitely made it worth the effort.
Now that we have our basic scenery done, we've been able to concentrate on projects requiring more work. The new and improved woods and a stretch of power transmission line are ready, and in the pipeline are pieces of ruins with vehicle wrecks, marshes or bogs, houses and the likes.